|
Keeping my costs down when it comes to groceries is important to me. But so is my time, and I certainly don't have a ton of that to spare these days- like most of you I imagine. 1. Keep an Inventory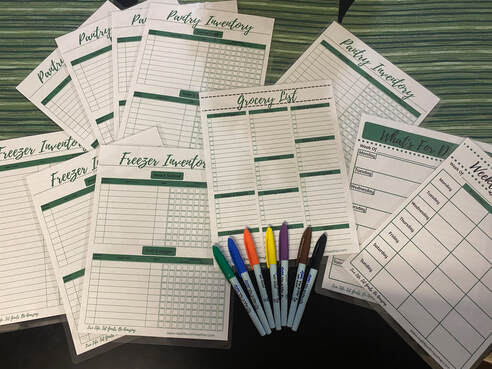 Keeping a pantry and freezer inventory (link to video of how I do this) is an essential step so that you don't purchase items that you already own. I mean, who hasn't wondered if they have mustard at home and bought another one just in case only to return home and realize you have two already... just me? Ok then. It also helps with meal planning! For example, say that you take a look at your pantry inventory and realize that you have 6 ingredients that need to be used up in the next couple weeks before they expire. You can make sure to build your meal plan using those ingredients, as well as other ingredients that you already have, which means that you avoid food waste as well as lower your overall grocery bill because you may only need to purchase a handful of items for the week rather than a whole basket full. I personally use this system and even brought my mom around to using it last year. We love it so much that I recently created new trackers for us in some of our favorite colors and fonts so that we could match our kitchens rather than continuing to use the ones we have been using for the past year or so. If you are interested in taking a look at those they are available in single item "Extras" for a couple dollars each at my Buy Me a Coffee page and in a bundle on Etsy. The set that I ended up printing for myself was the green in script font. 2. Shop the SalesAnother great way to save money on groceries is to shop the sales. I'm sure everyone has heard this before but it is worth repeating, if you buy the same items again and again look for a good deal to come around and stock up. Using your inventory will help here because you'll know what your preferred amount to have on hand is compared to what you have at home. If an amazing sale on taco seasoning comes around you better believe I'm buying a bit extra but that will only save me a few dollars a month... the big savings comes with your meats. If you have a freezer put it to good use and fill it with sale finds (working it into the budget, of course) when they come around. And then build your meal plan around what you have rather than the other way around like most of us do. One quick last note on this one: many people use methods to help stock up their pantries using this method. Buy 1 for now and 3 for later for instance... or 'when its on sale 20% less than normal I will buy double'. Find what works for your needs and goals. 3. Use Cash Back Apps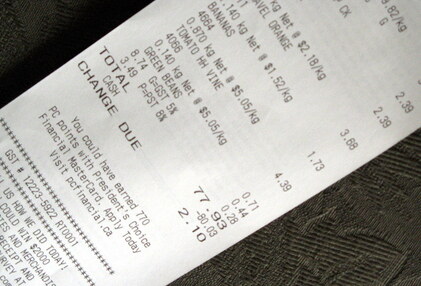 I've said this a million and one times I'm sure but I love a good cash back app. If I'm already spending money and I can get a small percentage back for 10 minutes of time a week while I'm watching TV you better believe I'm there. I have an entire set of folders on my phone dedicated to trying out apps for you guys to see if they are worth it or now. A couple months ago I made over $60 back in a single month! Not every month is that profitable of course but over the course of a year I can easily pay for a couple of my trips to the grocery store with the cash back and gift cards I receive from simple uploading receipts and clicking a few buttons. 4. Meal PlanI've mentioned meal planning a few times so I'm sure that you saw it coming, but... meal plan y'all. Meal planning, and following your plan, saves you money both on the front end like I mentioned before- less purchasing- but also during the implementation time, during the week when things get crazy. Have your schedule with you when you sit down to decide what you are making this week. If you aren't going to have time to cook on Tuesday then perhaps it would be a good day to use leftovers or a pre-prepared meal that you have in your freezer. If you know that Thursdays are the day you typically cave to eating out then plan to have one of your favorites on Thursday so that you are more likely to get home and have that meal rather than eat out. Having a couple of pre-prepared favorites in the freezer for days that just don't go as planned is a great idea. Some people like to have frozen pizzas, homemade taco filling (my fav personally) or burgers. Fast, simple and delicious- having favs already made makes it easier to skip not so great for you- or your budget- fast food delivery. 5. Plan for LeftoversLast but least, for today, is leftovers. The often dreaded and maligned food that didn't get eaten the day before. Not all of us love leftovers but most of us have them from time to time sitting in the fridge. I'm going to suggest having them on purpose though and even repurposing them into other meals. For example, if you are having fajitas on Monday then make extra to have quesadillas on Tuesday or Wednesday. If you make grilled chicken salads on Thursday then use that extra from your double batch to turn into buffalo chicken stuffed peppers on Friday night. And I haven't even talked about lunches- so many things that we have for dinner can be eaten the next day as lunch with minimal extra effort but with a totally different taste profile. That chicken from before could also have been Greek kabobs on the grill at night and then turned into a chicken Caesar wrap for lunch the next day. Save the food waste- and save a ton of time as well- by planning for leftovers. I hope that I was able to give you a few ideas that you may not have thought of before. If you have more ideas, let me know in the comments. I'd love to hear them! Until next time,  Medical costs are on the rise and, if you're anything like me, can add up in no time at all. I know that I'm not the average patient when it comes to my annual medical spend (I hit the max every year... thank you chronic illness) but even low utilizers can find themselves paying more than they should for medical care. I wanted to take a few minutes today to pass along a few ways to make sure you are getting the best deal on your medications- the bulk of most people's annual medical cost. If you haven't yet read my post about questions to ask before choosing a medical plan please click over as the number one way to save money on medications is simply to understand your medical and prescription drug plan.
1. FSA and HSA PlansFlexible Spending Plans (FSA) and Health Savings Plans (HSA) are accounts you are able to put money into on a per paycheck basis for medical bills on a pre-tax basis. If you have these plans available to you a strongly suggest that you explore those plans and run the numbers in various scenarios as they can save you a lot of money each year. In the case of HSAs they can also let you invest for future health care costs in retirement as well plus both of these plans lower your taxable income which is a plus. 2. Try a Sample FirstWhen you are prescribed a new medication you are typically given a script for a month's supply. Sometimes that new medication simply doesn't work out due to negative side effects or incorrect dosage and the rest of the prescription is wasted as you can no longer take it and have to get a new prescription. This waste- or resources and money- can be stopped by asking for a sample from your doctor before filling th prescription. They can often give you a week or even a month of medication for free to try before you buy as it were. If it works for you- awesome, less money out of pocket for something you love. If not- at least you didn't spend money on something you won't use. 3. Check Your Insurance Program's AppThe insurance program's app is often under utilized. Heading to the app can give you an e-card if you don't have a physical card with you can be helpful but they often have price comparison guides, lists of covered medications, contact buttons, and more just a click away so that you can check before you even leave the doctor's office what your costs are going to come out to (estimated of course). 4. Switch to GenericsGeneric medications are not the exact same formulation as the name brand but they are very similar and depending on your other medications, treatment needs, allergies, and etc. you could very easily be taking a generic form of a medication and see no difference whatsoever- other than big savings. There are circumstances where people are not able to tolerate one generic form of a medication or must take a specific brand name medication and those circumstance would out weigh the financial situation but the chances are that you can, and should switch to generics whenever possible. Example (according to GoodRx): EpiPen 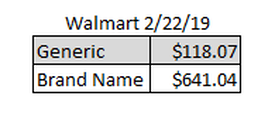 5. Ask About OTC OptionsIf you are on a pricey drug and have seen medications on the shelf at Wal-Mart that claim to treat the same ailment your prescription is treating you might need to switch to that over the counter (OTC) medication. Check with your doctor before making any medication switches as there may be other ingredients or drug interactions that are at play. I am currently on 3 OTC medications that the doctor has included in my daily treatment plan. This does mean that those costs -are not included in my deductible or out-of-pocket max though so I personally pay more per year due to this but I hit that max every year with my medical conditions... for the average consumer this will be more likely to help their budget than hurt it. Run the numbers to find out though and you may even be able to do this in reverse if there is a covered prescription drug rather than the OTC version. 6. Check Your Dosage OptionsJust because the medication is double the strength doesn't mean that it is double the cost. Ask your doctor if the medication you are taking two times a day is available in a scored tablet for twice the dosage. If it is you may be able to split the pills yourself each day and save money. Its important to ask if your medication can be split or not as extended release medications, caplets and some other medications cannot be split safely. 7. Price CompareYou may think that the price of your medication will be the same no matter where you pick it up due to your insurance card but that's not actually true sadly. Your insurance provider negotiates the prices of medications with these distributors so the cost varies by where you get your medications. There are apps out there whose sole purpose is to show you the cost of your medications at various pharmacies so that you can make an informed decision on where you fill your medication prescriptions. Combined with your insurance and any coupons you may have or be able to get through any of the options below you could save a lot of money and even get some medications for free! On this note... you should also ask how much it costs in cash, without insurance when getting medications. Sometimes it can be cheaper without insurance or you can use a coupon you couldn't with insurance to get a better deal. Be aware that going outside your insurance company means that it doesn't count towards the deductibles and out-of-pocket maxes so it may not actually be a better deal long term but depending on your situation it could save you money to go this route. 8. Mail Order/Bulk DeliveryOften times you can get a discount on the medications you take every month by having your doctor write you a script for 90 days rather than 30 days. You can have this 90 day prescription filled by an online pharmacy and shipped directly to your house saving you money on gas as well as the cheaper-per-dose prices for ordering in bulk. I typically use the one my insurance recommends but there are cheaper alternatives sometimes... just be very careful if you do this to verify the legitimacy and legality of having that particular pharmacy ship you your medications. 9. Coupons & Patient Assistant ProgramsBet you didn't know you could coupon medications. You totally can! Not every medication has a coupon or program available but a quick Google search of "Medication + Coupon" or "Medication + Patient Assistance" could net you big savings. I personally am enrolled in a program that pays most of my costs for a medication that costs over $2,000 per month up to $10,000 per year as well as using a coupon for my annual Epi-Pen (generic brand, of course). I have also had coupons for free inhalers and other medications. Many of these coupons and programs have requirements and stipulations (such as being under a certain income, having or not having a certain type of insurance or etc.) and an approval processes but taking the extra time to fill out the forms could save you hundreds or even thousands of dollars each year. The coupons might get you a discounted rate on the medication, a rebate for your medications if you mail in the receipt, or even free medication for a limited time. Most of these are from manufacturers so you do have to get the exact brand which isn't always the easiest to do but its worth it. My pharmacy is special ordering the generic Epi-Pen that I have a coupon for so that I can get the lowest possible price for my necessary medications, it will take a few extra days or maybe even a week but I'm willing to wait as those savings add up. 10. Prescription Savings CardsThis one is one that I will tell you to be careful with. While you can save money at point-of-sale for your medications potentially you may be going around your insurance plan to do so. Doing this means that it isn't being counted in your deductible and out-of-pocket amounts so, like moving to OTC medications, it may actually cost you more in the end if you are going to be getting up towards that out-of-pocket maximum amount by the end of the year so run the numbers and make sure you're making the best decision before you do this. Some cards don't go outside the insurance and work the same as a coupon though... just be careful and ask the Pharmacist to explain all your options and how it will interact with your insurance plan before choosing this option. 11. Pharmacy Discount PlansPharmacies are always trying to get customers in the door and need repeat business just like any other business so they often will have discount programs for their customers that they run... especially big-box stores like Kroger and Wal-Mart. Wal-Mart has a $4 prescription plan for instance for a 30 day supply of medications for a list 2 pages long. If you are taking one of these medications then it would be a good choice to consider them for filling it. They make money off the other medications you fill with them as a repeat customer so it makes sense for them and it makes sense for you as its cheaper. One thing to note here is that if you are getting medications at different pharmacies you should make sure that they all know all medications you are taking. If they don't they can't give you important information about drug interactions or valuable suggestions on alternative options. They may even be able to match price with the pharmacy you are getting your other medication from if you let them know that's why you aren't getting all of your medications from them. 12. State Subsidies and Other Care PlansDepending on your situation you may qualify for additional assistance from the federal or state government. If you think this could apply to you it is important you reach out to to their assistance agencies to find out if you qualify. These programs are often limited to those in lower income brackets, on other assistance programs, enrolled in Medicare or etc. but looking at all of your options is an important part of advocating for the best possible care you can get. 13. Talk to Your Doctor...If you have a question about why you are being given a specific medication or if there are alternative options then the best person to ask is your doctor. Being open with them and discussing the financial implications of your treatment plan is the first step towards being an informed, involved participant in your own care which is what we all should strive to become. If you let your doctor know that X medication is higher priced than you can afford and ask for alternatives they can help. Often they are not aware of medication costs as they are not involved in the negotiations your insurance company has annually with drug manufacturing companies, but once they are aware they can help you find an alternative treatment option that is a better fit financially but also works for your health management. 14. Ask Your Pharmacist...The last tip today is simple to ask the pharmacist: is this the cheapest option? They may know of a coupon or other discount that can save you money on the spot. Don't...
I've been wading through this costly medical system most of my life but hopefully you won't have to waste as much money as I'm positive I did over the years while still learning about these options with these tips. Until next time,  Formulary, Preferred, Generic, Name Brand, Off Label, Pre-approval, Copay, HDHP, PPO, HMO... there are so many possibly unfamiliar terms when it comes to medical insurance. When you are signing up for a medical plan, whether through your employer or the market place, it is imperative that you make yourself an informed consumer. This means taking the time to understand all the ins and outs of the plans available to you and your family. If you are choosing insurance through your employer the Human Resources department can be an invaluable resource for you. They know the ins and outs of your plan(s) and if they don't have an answer to a specific question they can often give you the number of someone who will. It is important to remember that they are still your employer and coworkers so you may not want to share ALL your medical information with them but they can help to explain your plan options in broad strokes so that you can chose the best plan for your family. A few things to look for: What pharmacies and providers are in-network?Never ask a provider if they 'take' or 'accept' your insurance- the answer will likely be yes- you want to know if they are in-network. I'm not completely jaded and understand and even trust that most providers will be up front with me if I mess up and ask if they take my insurance but I was burned once, badly, and learned my lesson so no longer do this. In my case I was lied to by a front office staff member at an Urgent Care center and spent the better part of a year fighting about those out-of-network costs with the provider and my insurance company, it was not fun. If there is a provider that it is important that you see then you should call the insurance company and ask if they are in-network before you sign up for a plan and double check with your insurance company before going to a new provider. Going out of network can mean significantly higher costs not just for your specific medication or visit but for the whole year as you have separate in- and out-of-network deductibles and out-of-pocket maximums. It may look something like this: 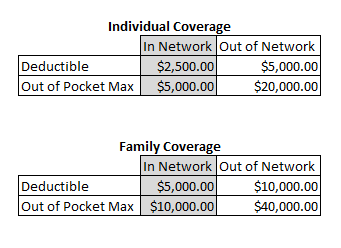 Are there Preferred pharmacies?This can often save you money as well. You will often see this affecting you when it comes to co-pays and co-insurance so it never hurts to ask. Going across the street could save you 10%! What is my deductible?Is there a per person deductible or per family? Does it include prescription medications or is that a separate deductible? Some plans will have a separate prescription deductible that you will have to meet before medications reduce in price or become paid for. This deductible will typically go towards to you out-of-pocket maximum just like your medical deductible but its important to know if you are going to be juggling multiple deductibles. What is my individual and family out-of-pocket maximum?If you have one high utilizing family member then its important to note that often plans will include a per-person cap that can keep your costs lower... you many not have to get all the way to the family out of pocket max to stop paying for that person's care for the year. This can be a lifesaver when it comes to the budget. What medication are formulary or covered?Check the plan every year, even if your plan has not changed, to make sure that all your current medications are covered. Insurance companies issue a new list of changes each year and you can often find this on the website but if not then simply call in and request it. How does the co-insurance work?Once you hit your deductible you will often still be responsible for some of the costs until you reach a higher number, the out-of-pocket maximum. This is usually calculated at a percentage. So if you have a co-insurance of 80% once you hit your deductible that would mean that you are responsible for paying 20% of the cost for your care until you reach that number. In and Out of Network still apply for this portion of your yearly cost so its important to stay in-network if at all possible. What are the requirements for Specialty medications?For certain medications, typically higher costing medications and ones that require temperature control, some plans will require you to use their Specialty Pharmacy in order to get them filled. This saves them money which in turn saves you money in the long run but it can be a little frustrating to have to schedule delivery for these medications and call in your payment/authorization to ship each month. If you have a medication that falls under this type of requirement they will let you know when you try to fill it at a retail pharmacy but if you think it may apply to your situation it could speed up the process to simply call the insurance company to ask up front what their policy is in regards to that medication. Processing at these pharmacies takes much longer than your corner CVS so planning your doses out is imperative for these kinds of medications. How do Prior Authorizations work on this plan?Certain medications, treatment plans, surgeries or even provider types may require Prior Authorization in order to be covered. These will typically span a length of time and then require renewal if it is an ongoing treatment. This is a pain to go through and number two cause for my personal medical plan headaches but its important to understand and follow this process or you could end up paying the full cost of treatment as the charges will be denied. I am personally on a medication that costs over $2,000 per month for me to take... you can bet it requires Prior Authorization. Every 6-18 months (depending on how long they authorize the treatment plan) my doctor's office has to file paperwork showing that I still need the care. Sometimes its easy but other times its a fight. Sometimes its just not worth that fight and we will chose an alternative treatment or I will pay out-of-pocket, like i did for my current rescue inhaler. Being prepared for this process and not letting it frustrate you if important- the insurance company is trying to keep their costs down by verifying that the treatment is necessary which helps keep costs from rising even more for everyone. What do I need to do in order to see a Specialist?For some types of plans all you have to do is show up to receive covered care but for other you may need a referral. Knowing this up front will save you headaches and money from fees for seeking care without a referral. Is ____ covered?If you are looking for a specific type of care then ask up front if it is available on plan and if so how many sessions/how often you are able to get it. A good example of this is chiropractic care. Some plans offer it but they may limit the number of sessions you are able to have covered per year. Other options could be infertility treatments or in-home care. If its not then you may need to purchase supplemental insurance or go with a different plan. Are there any perks to the program?I am with Blue Cross Blue Shield of Texas currently and there are a ton! My plan includes an identify theft program, a gym membership discount plan, teledoc services, free coupons to all kinds of health related retailers, discounted magazines, a wellness points plan and even discounts on services they don't cover like acupuncture and massage at certain providers through one of their free programs. On the wellness plan I get points for doing things like going to the gym, taking an online class, entering my stats quarterly, and etc. which I can exchange for prizes like kitchen gadgets, gift cards, and more. You can bet I participate in this when I have time... a few minutes while waiting around gets me a little closer to a free blender. :) Does this plan qualify for a FSA or HSA? If so is one offered?Flexible Spending Plans (FSA) and Health Savings Plans (HSA) are two ways that you can pay for medical costs with pre-tax money. They both have their own requirements as well as good/bad points but having access to pre-tax money can save you quite a bit of money. I'll do a separate post on these plans but if your employer offers them please learn about them and utilize them. They may also have a Limited FSA just for Dental and Vision, a Dependent Care FSA to help pay for childcare expenses pre-tax or an Health Reimbursement Program (HRA) that, while it isn't tax free, is free money to help you meet your medical costs if you submit for it. All of these plans are going to be employer specific in whether they are provided and through which providers but making sure to really understand your benefits package is an important part of providing health care for your family and being an advocate for your own. I hope this helps you navigate your medical insurance journey. Until next time,  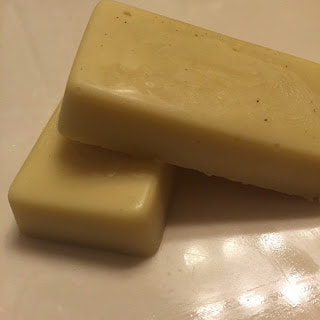
I recently discovered lotion bars and I pretty much love them. In my opinion, they aren't for everything but I love being able to use them on my hands and arms after a wash-up without the grease that typically comes with lotions. Don't get me wrong, I love (and use regularly) my body butter... just for different purposes than I use lotion bars for. A lotion bar has become the go-to for my morning routine and I don't see it going anywhere anytime soon, especially with the hot Texas summer coming up!
A couple reasons I have a few of these bars around the house:
Not sure if you would like them? The good news is that these bars are quick to and super easy to make so you can try them out without much at stake. Plus, you can customize them with various molds and additives to make pretty gifts for friends and family or as a bit of decor on the bathroom counter top... but you'll like them! First Up, Gather Your Ingredients:
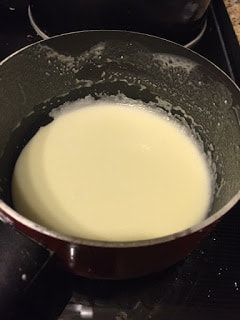
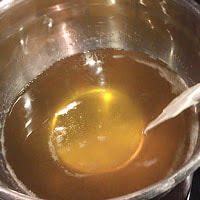
The How-To: 1. Melt all ingredients in a double boiler on low to medium heat. Don't have a double-boiler? No problem! Since I am living with my parents at the moment I don't actually use a double-boiler for this... just a pot of boiling water with a metal or glass bowl inside. It works great!
2. Add in any essential oils you would like in your lotion bars.
3. This is your time to customize your bars! For the bars shown below I did the following (before pouring the mixture into the molds) to showcase the scent and add a bit of a decorative touch for gifts: a. Chocolate: Dust a small amount of cocoa powder onto the mold. b. Lavender: Sprinkle a few dried lavender buds into the mold. c. Sweet Orange: Sprinkle a bit of dried orange peel into the mold. You could also do rose petals, dried lime or lemon rind, ground cinnamon or vanilla... the possibilities are endless! Note: Use dry ingredients so that the moisture content is correct. 
4. Pour the mixture into soap molds (or cupcake tins, chocolate molds, etc.) and pop into the fridge until they harden.

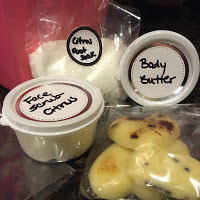
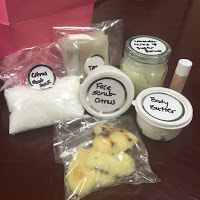
5. After ensuring that the bars are fully cooled and solid remove them from the mold and package as you wish.
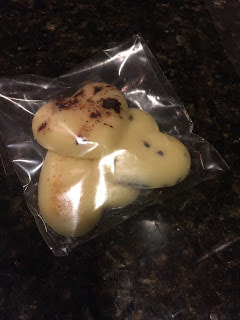
6. Give them away in gift baskets or as hostess presents... or use them yourself!
Non-perishables I used in this DIY (I used a different mold from Hobby Lobby but prefer the silicon ones over plastic so have added a few silicon ones here for you guys).
Laundry detergent has a ton of chemicals and fragrances in it typically that I don't want in my house... and it's much more expensive than it needs to be. I'm sure we've all seen more than a few articles and posts in the past few years that made us question if we should be using detergent at all: the scary piece in the news about brighteners, a blurb on social media saying that detergent manufacturers are telling you to use too much detergent in order to get more of your money, detergent remaining in clothes after washing and potentially causing skin irritation, detergent destroying your clothes... yikes! Were any of these pieces accurate? What was the alternative if they were? If you are like me you may have thought there was none and just kept using your detergent for a while but kept a watchful eye open. Eventually I decided I didn't want to continue using detergent on my clothes any longer so I searched for alternatives. There are tons! I found all-natural brands of detergents, homemade detergents of various types as well as laundry balls and probably more that I haven't come across yet. I used a laundry ball for about a year and, to be honest, I really liked them. I was able to run my washer on cold water which saved me money, my laundry cost was low as I only needed to replace the ball after a large number of washings, my clothes seemed to get clean, all was right in the world but people kept asking me how I knew they were really clean if I didn't have any soap or detergent in the wash. Eventually though I decided I felt better about using some form of cleaning agent in my laundry. I continue to read information on alternates to store-bought laundry detergent regularly. It's a personal preference and I may change my mind someday but, for now, I'm back to using a detergent. The difference this time is that I make it myself so I know what is in it. As a plus: it saves me money and is soooo simple to make. Score! Ingredients:
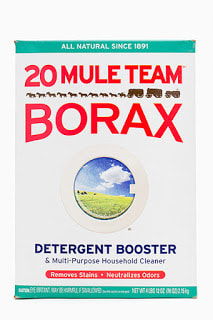
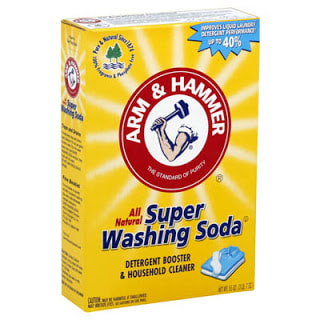
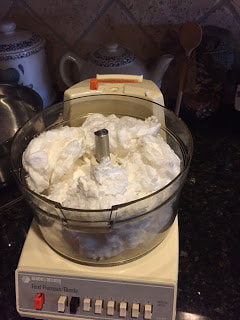
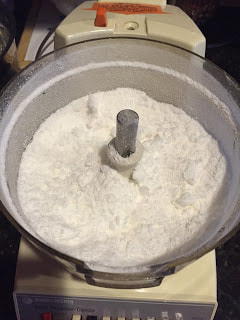
I had a bit of trouble finding Washing Soda and Borox in my store after I moved as few people apparently request them there... so here are the boxes of the brands I am using in case you run in to a similar issue. Procedure: 1. You will need to start by flaking/grating your soap. There are at least two options to do this: grate it with a cheese grater or toss it in the food processor. Zote does come in a flaked form but I had read some reviews about using it in detergent that I wasn't very happy about so I'm back to Ivory now. One cool thing about Ivory is that you have a third option: microwave! I don't know if this works with other forms of soap as I haven't attempted it. (If you do, let me know! I'd love to find out!) If you are using Ivory and want to use a microwave here's how: 1. Chop your soap bad into smaller pieces and arrange them on a microwave safe dish.  2. Then place the dish in the microwave and microwave it for about 1-2 minutes... you'll know you've reached the right time when it looks like this. 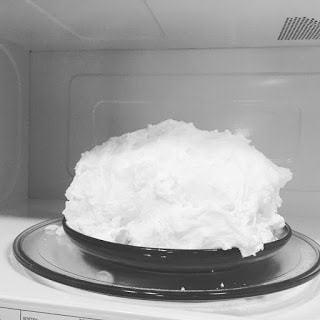 3. Let the 'soap cloud' cool. It may smell a bit at first so if you leave it in the microwave for about 45 minutes or so it will be cool to the touch and won't really smell anymore. 4. Place the soap cloud into your food processor and it will turn into powder! Ok, this step isn't 100% necessary, you can use your hands to turn it into powder as it will crumble very easily. I just prefer doing it this way and I already had the processor out for another project so I blitzed it quickly and moved on with making my soap.
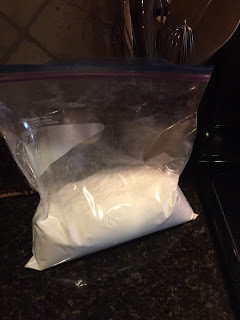
I've found that the most efficient way to make detergent regularly has been to grate up enough soap for 3-4 batches all at once so that I can quickly measure out the ingredients and get on with my day when it comes time to making detergent again every month or so. Again, a personal preference.
5. Mix your borox, washing soda and soap together in a 2:2:1 ratio (so 2C borox, 2C soda, 1C soap or 1C borox, 1C soda, 1/2C soap, etc.). 6. If you want to add some baking soda or OxiClean (both are optional) you would make this at the same amount as your soap. 7. Done! You will typically need between 1/8-1/4C of this detergent per load depending on size. I keep mine in an airtight container with a scoop in it so that I just pop it open and put 1-2 scoops in and am on my merry way come laundry day. :) What alternatives to store bought laundry detergent have you used? Which worked best? This is another favorite recipe for a super moisturizer. It is a bit more greasy than the lotion recipe I posted the other day but it a great night moisturizer for dry feet and hands especially. I only mention that it is a little more greasy because I do not use this as a hand cream personally. I know some who have skin that is more dry than mine and use it all day long. They rave about how it has helped their dry skin so it all depends on your skin/body. Another good thing about this recipe is that there are fewer ingredients... the beeswax and aloe vera are left out of this version, making it a more simple and cheaper option to start out making. The procedure for this body butter is almost identical to the lotion so if you thought that was a piece of cake then this one will be too. I typically make a batch of both the lotion and a batch of the body butter and keep them both around the house as I use them for different things... experiment a little and see what works best for you and your family.
NOTE: A single pound of these 'butters' will likely last you nearly a year's worth of lotion or body butter for one person or several months for a family so there is no need to over purchase. INGREDIENTS:
EQUIPMENT:
PROCEDURE: 1. Measure out your ingredients. You will likely need a knife to cut the cocoa butter. 2. Place the shea butter, cocoa butter, coconut oil, and sweet almond oil in a small saucepan on LOW heat. You do not want the mixture to boil or smoke... it needs to be kept very low. The ingredients will melt fairly quickly even on low heat. 3. Once everything has melted, mix in the vitamin e oil and any essential oils you may want for added scent or aromatherapy needs then remove from heat immediately. I prefer peppermint as it smells delightful with the cocoa butter but sweet orange (think one of those chocolate oranges in scent), lavender (for calming, evening use especially), or citus work very well also. 4. Allow the mixture to cool until it has just begun to set up. You can just leave it on the counter for a few hours and go about your day or be like me and toss it into the freezer for 10-15 minutes to speed up the process. 5. Once it has begun to set up you will use the electric mixer to beat the mixture into the creamy consistency we are looking for. This adds air to the mixture so that it isn't quite as dense. NOTE: If you let the mixture get to hard/cool then it is easy to apply a little heat and mix with a spoon for a minute or two to get back to the correct consistency. 6. Add it to a jar and allow to finish setting up for half an hour or so. Curious where I get my ingredients? I get my ingredients all over the metroplex, on Amazon and through Young Living as a distributor. Don't want to search out stores to pick them up? I'll make it easy! You can place an order through me for any oils you may need and there are quick links for the non-perishable ingredients and tools on Amazon should you wish to order online on this page... just click on the ingredient.
I am allergic to aluminum... this means traditional, store bought, deodorants are pretty much off the table for me. Now-a-days this doesn't bother me as I've seen quite a bit of research to show that our traditional deodorants with antiperspirant properties are bad for you anyways but for years it was the bane of my monthly shopping expedition. Until you have tried more store-bought options than you can remember you just don't understand the struggle to find a good aluminum free deodorant. Ones I remember off the top of my head:
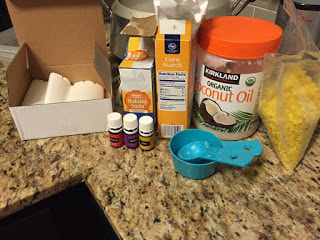
The ingredients were pretty much things I already had on hand in my house (except corn starch but that was a quick fix at the grocery store and now I have more than enough for my suburban homesteading/diy adventures to come for quite a while): cornstarch, baking soda, coconut oil, beeswax, and essential oils (lemon, frankincense, and lavender).
I simply followed the step by step directions to combine all the ingredients with low heat then add in the essential oils once well combined. It was a quick recipe to follow and ended up giving me two beautiful sticks of deodorant.
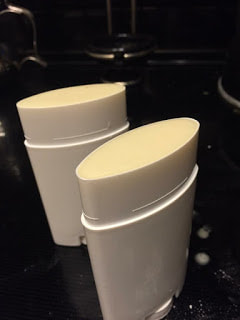
One note: it is a little difficult to get them to turn properly with my containers at first but I just used a towel to get a firm grip and kept turning until it began to move and now there are no issues.
I've been using the deodorant for about two weeks now and have had no problems with smelling sweaty and gross in the day to day activities, even in a Texas summer! Now for the problems...
UPDATE: I have tried about a million combinations at this point it feels like. I ended up halving the recipe but upping the beeswax and using Purification oil and Sweet Orange Oil plus a little bit of Lemon Oil to create the deodorant I am using now. I will post an official update post with the measurements in September. Give it a try... it's easy, healthier than store bought options for your body, and quite inexpensive to boot! I will be sharing my lotion/body butter recipe soon (wonderfully rich and silky... and only slightly more complicated than this recipe) so look for that in a few weeks! What would you guys like for me to try and make next? Comment below! Curious where I get my ingredients? I get my ingredients all over the metroplex, on Amazon and through Young Living as a distributor. Don't want to search out stores to pick them up? I'll make it easy! You can place an order through me for any oils you may need and here are some quick links for the non-perishable ingredients and tools on Amazon should you wish to order online:
|
Archives
October 2022
Categories
All
|


 RSS Feed

© COPYRIGHT 2015. ALL RIGHTS RESERVED.