|
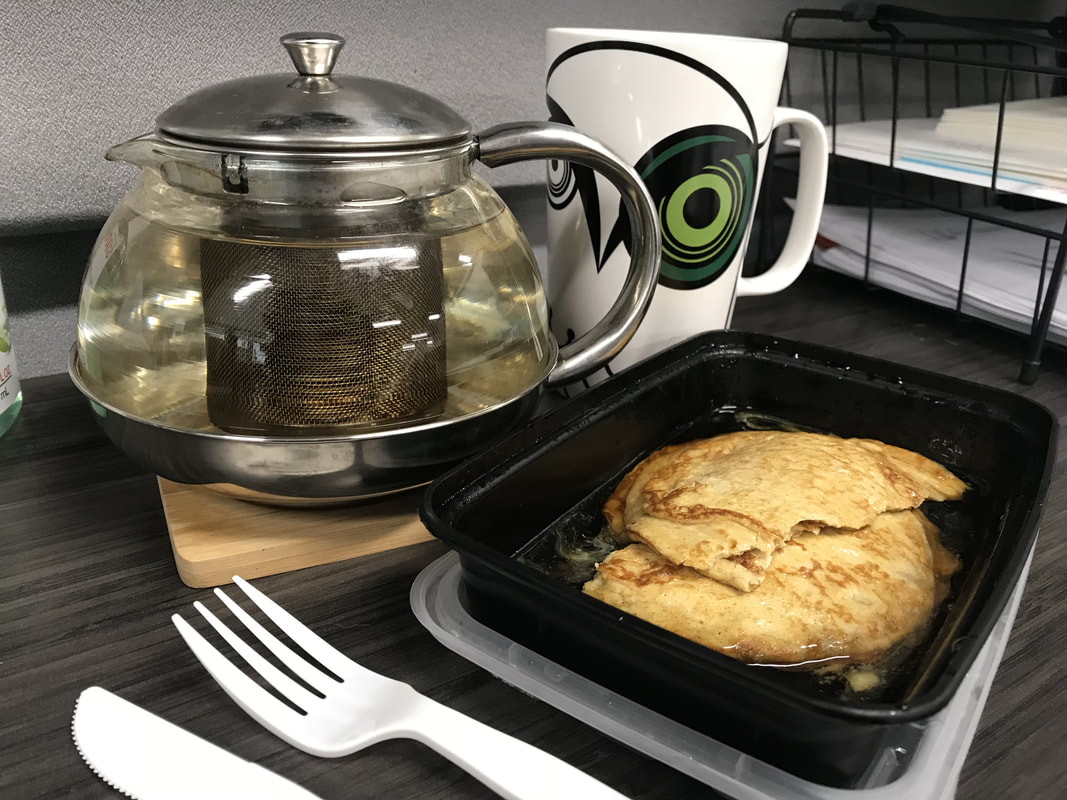
The smell of fresh pancakes brings forth memories of Saturday morning cartoons, family fun in the kitchen and breakfast for dinner creativity. Once I stopped eating gluten I realized pretty quickly that while I could deal without bread pretty easily pizza, pasta and pancakes were quick staples that I'd grown up keeping on hand for meals after an exhausting day and I missed them. I've been searching for a truly great gluten free pancake for ever since... for years now... and I've finally found one I love. This recipe is one that I have been regularly working into my meal preps for a while now and feel confident saying I will keep using. They have a touch of cinnamon, a hint of vanilla and just enough sweetness to sate the desert craving should I want to stuff them with whipped cream and some chocolate shavings or a few berries. I freeze them in 2-3 pancake stacks and microwave them once I get to the office most days but occasionally I'll do breakfast for dinner and pair them with scrambled eggs or an omelette. Either way they are delicious! A couple quick notes: these are not the thick fluffy pancakes you get at breakfast restaurants (but if you let the mixture sit for a little bit to thicken up you will be able to get them a bit thicker but they will still be a thinner pancake). The reason these pancakes work is the blender, I've tried making them with a whisk and I couldn't get them quite the same. Ingredients:
Other Items Needed:
Directions:
I love tacos... savory spiced meats with fresh crunchy veggies and lots of salsa, yumm! Unfortunately most taco seasoning mixes have junky ingredients in them which takes the happy out of my Taco Tuesday fun. So I decided that it was high time I create a spice mixture to replace those seasoning packets. It won't be perfect for everyone so feel free to make tweaks and changes to it as everyone prefers slightly different combinations of ingredients in their 'perfect taco meat' (which is why there are at least 10 versions of taco seasoning at the grocery store and not a one of them tastes like the others) but I've been enjoying it in my lunches recently.
Before I get into the spice mixture I want to stop over in the mix-ins area of taco meat for a moment. Depending on what you are looking for taste-wise and the amount of added veggies you want to have in your meat there are many options for veggie mix-ins to cook with your taco meat. Some are:
I personally use mushrooms and salsa (I pretty much always have these on hand and tacos can be a bit of a last minute dish for me, like pancakes! Sometimes I just get a craving and think 'why not?') as my go to. They are what I used last week but there are so many options! Try one, try them all, try mixtures of them, try new things altogether and tell me how they turn out! If you are new to adding veggies to your taco meat I would suggest that the smaller the dice the better for beginners so perhaps start with shredded and pureed veggies and then move up to a little chunkier portions later on. Personally I'm not a big fan of diced bell peppers in my taco meat due to the texture/bite so this may be something that you add later on as well if you are like me. Another thing I do to add nutrition and flavor is use stock or broth instead of water when simmering my spices in with the meat. Something I noticed when checking out various recipes and packages of seasoning mixtures (other than the crazy amounts of additives and the fact that most have gluten) over the last 6 months or so was that bullion, or similar flavoring agents, was a common addition. It isn't necessary to use broth but it does help with that missing element from the flavor palate of the store bought packets, especially when using lower fat meats, such as poultry, that can be a bit lackluster on the flavor side and dry out easily. The procedure I use when making my (Tex-Mex/restaurant style) tacos is simple. I understand that these are not traditional tacos and while I do love those as well I was trying to replicate the simple 'brown meat and add a spice packet and water' style of taco meat with this recipe.
Ok, seasoning time! This seasoning mixture makes about 4 dinners worth of spice mixture (depending on how much spice mixture you prefer). I typically use 2-3 Tbsp per pound of meat. Just mix it up and store it in an airtight container between uses.
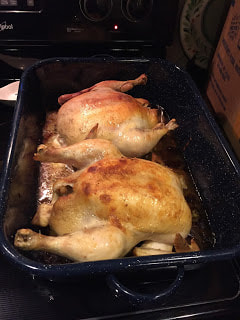 Roasted chicken can be quite complex but it doesn't have to be. This staple in the kitchen can be completed in about 2.5 hours with minimal hands-on time and makes a wonderful dinner. I made two chickens at once in a roasting pan with about 10 minutes of prep from start to finish and kept it very simple for this recipe (the recipe and instructions below are for one chicken). I wasn't at home when I made the chickens above which means that I didn't have fresh garlic or herbs... so I just used minced garlic, salt and pepper for the seasoning and stuffed the chickens with onion alone. It was a hit even without the herbs and fresh garlic. Also, since I went very simple I didn't need to tie the legs together but if you are going to be using stuffing you might consider doing so. I'm all about simplicity and using what I have available whenever possible so most of my recipes are easily adapted for a wide range of options, this chicken included. INGREDIENTS:
NEEDED:
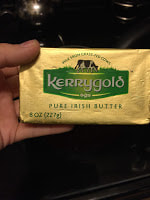
DIRECTIONS: 1. Preheat oven to 425 degrees Fahrenheit. 2. Chop your onion and garlic (if using fresh). 3. Melt the butter. 4. Stuff herbs and onion into the cavity of the chicken. I tend to save any that does not fit inside to rub on the chicken after I salt and pepper it. 5. If you are using fresh garlic rub it onto the chicken. If not then you will add your dried garlic with the salt and pepper. 6. Sprinkle salt and pepper onto the chicken and place it breast side down into the roasting pan. 7. Baste the chicken with half of the melted butter. 8. Bake the chicken for 15-20 minutes. 9. Reduce the oven's temperature to 350 degrees Fahrenheit. 10. Baste the chicken with the remaining melted butter and continue baking at the reduced temperature for 1.5-2 hours depending on the weight of the chicken. (Do not consume under-cooked chicken. Please check internal temperature of chicken.) 11. Allow the chicken to rest for at least 10 minutes before carving it in order to maintain the moistness of the meat. 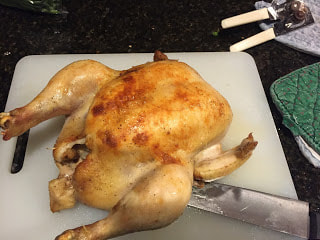 "Ghee is a class of clarified butter that originated in ancient India and is commonly used in South Asian cuisines, traditional medicine, and religious rituals." -Wikipedia In today's world there are a lot of people who cannot tolerate dairy, myself included. One of the good things about ghee is that, when it is prepared correctly, the milk proteins are removed. This means that many people who cannot tolerate butter can tolerate ghee. Basically, it is the best of both worlds: the benefits (and taste!) of butter without the casein and proteins that you may react to. You can find ghee in the store: 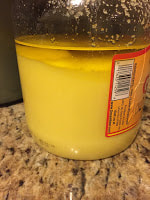 ... but I suggest you make it yourself if you have lactose intolerance as I have found that it is very easy and a lot more of the milk proteins seem to be removed when I make it myself than when I purchase it at the store. The exception to this would have to be Tin Star Food's ghee. I have heard awesome things about their ghee from people who do not tolerate dairy well. This isn't to say that other brands' ghee isn't great, I just haven't tried it so I don't want to speak to it. The brand of ghee you see above ended up making me decide to stop being lazy and make some ghee at home again. That's good for you guys though because you can now see how I make it! INGREDIENTS:
EQUIPMENT:
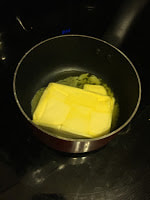
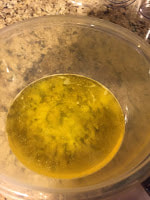
PROCEDURE: 1. Place butter in sauce pan over low heat. I couldn't find grass-fed unsalted butter so I am using a salted variation.
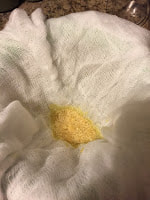
2. Check on butter regularly over the next 2-3 hours, stirring as necessary. It does take a long time to make but you don't have to stand over it the whole time. I often put it on and then go clean my house or do homework, checking on it about every 20-30 minutes. 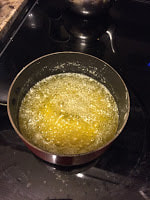 3. When you see the milk solids have settled to the bottom and begun to brown so your liquid butter has become golden in color it is time to remove it from the heat. When it gets close to this point though I suggest you stick close to your pot to make sure you only slightly brown the solids verses burning them. I should have left this batch on the stove for a few more minutes so that the milk solids would brown a bit more but I was running behind. It still came out beautifully though. 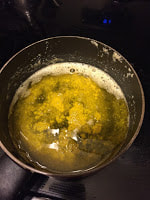 4. Strain the liquid through cheesecloth into a non-plastic container (I have melted a plastic one before... oh the mess!). The milk solids will remain in the cheesecloth while your ghee will strain through the mesh to the container beneath. 5. Place your ghee in a container. If it has been prepared properly you won't need to refrigerate it and it will last for months.
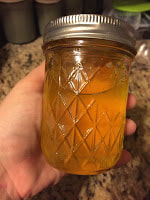
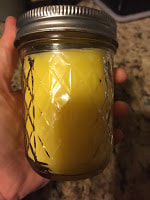
The unrefrigerated ghee is on the left but if you do store it in the fridge it will look like you see on the right.
One thing to understand about ghee is that the flavor is more intense than the butter you started with. I would suggest adding a little at a time to your dish when first learning to cook with ghee for this reason. Another, awesome, thing to know is that the smoke point is incredibly high so it is great for high heat cooking like sautes and stir fries! I have heard it said that 'you flavor with it like butter but cook with it like oil' and I find that to be fairly accurate but I tend to use less ghee than butter when flavoring with it due to my personal preferences on taste. Shredded chicken is incredibly versatile. You can toss it in a variety of sauces for instant wrap filling, burritos, spreads, and more... or just eat it plain on a bed of salad greens with a drizzle of your favorite vinaigrette for a quick and healthful salad. I prefer to make my shredded chicken in bulk when I find a good sale and freeze it up in batches for later use. It's simple, quick, and saves time when preparing last minute meals or bulk cooking chicken meals in later weeks.
INGREDIENTS:
EQUIPMENT:
PROCEDURE: 1. Place chicken in crock pot.
4. Allow the chicken to cool for a few minutes before attempting to shred. If you are using the two forks to shred the chicken I suggest that you allow it to cook quite a bit as I have been burned quite a few times trying to rush to get it shredded and off my to-do list... its not worth it. 5. Shred the chicken. My suggestion is to use the electric mixer to shred the chicken by simple putting the mixer in the bowl with the chicken and 'mixing' like you would cake batter. The chicken shreds very quickly with this method and you avoid burned fingers. :) 6. Allow the chicken to cool completely before freezing it into portions appropriate to your family's needs to avoid ice crystals forming in the containers and on the chicken itself. This recipe is what I call a 'dump' recipe. You literally dump all the ingredients into the crock pot and walk away. It can't get much easier than that. Use this shredded chicken as a topper for a baked potato, a stuffing for enchiladas or tacos, over rice, as a nacho topping, or just by itself as a protein main. Whatever suits you fancy. :)
INGREDIENTS:
PROCEDURE:
Once again we look at chicken. This easy recipe has about 5 minutes of hands on time and is ready before I've finished my evening 'chores' making it a go-to meal when I was married. I've had it on salads, as a protein main with steamed or sauteed veggies, and sliced cold in a wrap... it was pretty tasty any way I tried it. Feel free to mix it up and try this with other spice combinations, the recipe listed below uses Taco Seasoning mix but there are other options. See the "Mix It Up" note at the bottom for two alternate versions that I have already tried out myself.
INGREDIENTS: 2 lbs Chicken Enough taco seasoning to coat the chicken (1/4 C or 1-2 packets of clean taco seasoning or this) NECESSITIES: Large bag or deep bowl for coating chicken Baking Dish PROCEDURE:
MIX IT UP: You can do this with a Tbsp of almond meal and Italian seasoning as well. Just add a little melted butter or ghee drizzled over the top for a delicious pairing with zucchini pasta or other Italian inspired meal! Want a Cajun version of this? Just sub the taco seasoning for cajun spice mix and you've got the beginnings of one of the tastiest ceasar salads I have ever had. Yumm! The possibilities are endless! :) Fajita chicken is a staple at my house. I use it in fajitas, tacos, on salads, as a protein main with other veggies such as green beans or squash and zucchini... you could even top a potato with it and other 'fajita' toppings for a tasty meal higher in carbohydrates. It's pretty versatile. Quick and simple, just like I like it!
NOTE: If you have a George Foreman grill or similar you can simply season the meat and put it on the grill for a fast salad topper. It is lower in fat this way and not quite as tasty in my opinion but very fast and easy. I do not have a grill at the moment, of any type, so am working on fajita meat on the stove top. This one is just a seasoned meat rather than a marinade but I am working on a marinaded fajita chicken as well. INGREDIENTS:
PROCEDURE:
Sorry I've been MIA guys... it has been a little bit crazy in my personal life this past week with a new doctor, an MRI, grad school starting up again and some other personal issues so I wasn't able to get a lot of blogging work completed unfortunately. Never fear, I am not gone from the net-verse! I have a list of posts that I am working on currently including a review of one of my favorite running apps (I can't run but I love it for my walks!) plus I ordered the backpack that I was talking about in my previous post. It should get here this week so that review will be upcoming as well- I'm so excited! Then it's a couple of recipes and a post about how I organize my household chores for quick completion throughout the week. I completely re-did my chart to show you guys how I came up with my personal plan from start to finish so that you can design your own that works for your family! For today though I am talking about two recipes for roasted chicken that are very simple to make. Read more below. 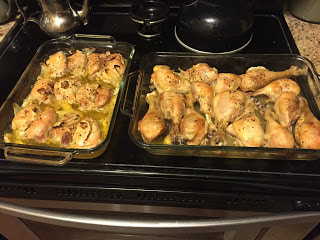 This week I decided to stick with chicken as my main protein as it was on sale and I've had some big expenses lately. I picked up some chicken thighs and drumsticks for a good price and headed home to see what I would come up with once I got in the kitchen. Unfortunately by the time I got home I wasn't feeling very well at all as I had had an MRI earlier in the day and the contrast dye really doesn't get out of system as fast as the doctors say it should- possibly due to the MTHFR but its an unknown and doesn't really matter in the end. The dye makes me sick to my stomach and causes my POTS to act up... I had to wait a while after the MRI before I could leave as I was pretty dizzy actually. So I went with as little time as possible on my feet in the kitchen and had some cuddles with my pups. Here they are... I love my love-bugs! The one on the left is Roxanne or Roxy and on the right is my Isabel or Izzy. They are both 4 years old turning 5 in January and February of 2016. Roxy just had quite the health scare if you recall- she almost died! She is doing so much better now though, happy as a clam and hyper as all get out. Isabel is a bit more mellow but is crazy about her ball and will bug you for hours on end to throw it again and again... do not forget to pack it if we go visit somewhere or there will be craziness. It's basically her binky... and the only toy she cannot destroy in less than a minute (tennis ball to gravel in 60 seconds people, for serious). I will likely review the toy maker at some point since I have quite a few of their toys if anyone is interested.
For the chicken thighs I drizzled a little ghee and 2 cloves of rough chopped garlic (you could use melted butter if you prefer), did a quick massage to get everything coated well then sprinkled on some sea salt and fresh cracked black pepper and popped it in the oven. If you want it with a little kick add some paprika... yumm! 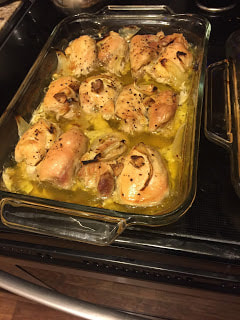 For the drumsticks I went with a citrus taste. I simply squeezed two lemons and a lime on top of the drumsticks and added the same salt and pepper as on the thighs. There are so many options for this with marinades including zest, spices and etc that I will be going back and experimenting with this combination again in the future but tonight I just wanted fast but still tasty. 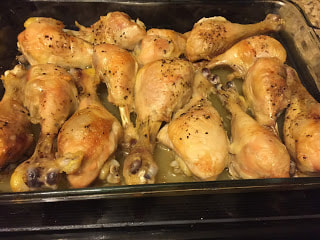 For both of these dishes I set the oven to 300 degrees in order to get a slow roast on the chicken over a couple of hours. Depending on the amount of chicken you have in the oven the cook time could vary but it took about 3 hours for mine to be fully cooked. Make sure to check the internal temperature if you aren't sure if the chicken is fully cooked or not. So far I have enjoyed these dishes as lunches and dinners throughout the week. What other ways do you cook up chicken in your house? :)
I was flipping though the pages of 21 Day Sugar Detox and saw a soup that looked really tasty but unfortunately I didn't have all the ingredients to make it in the house. It was a Miso soup remake and I'll definitely make sure to try it soon but I didn't want to go shopping so I took the inspiration and made my own soup with things I already had in the house. It made an awesome lunch and there were enough left overs to add to my ready meal stock for the rest of the week (more on that in a future post). This recipe could easily be made in a crock pot- just put everything in at once and set it on low for 4-6 hours. The recipe below made 5 portions. Here's the recipe:
INGREDIENTS: 36 oz Bone Broth (I used beef today because that is what I had on hand) 1 Tbsp coconut aminos 3 drops fish sauce 1/2 medium onion, diced 2 medium zucchini, diced 2 cloves garlic, diced 1 Tbsp parsley, dried (feel free to use fresh, I didn't have any on hand) 1/2 lb white mushrooms 1 lb cooked shrimp PROCEDURE: 1. Bring the broth to a simmer with the coconut aminos and fish sauce in a large pot on the stove top. 2. Add all other ingredients to the pot. 3. Put the lid on the pot and turn the temperature to low. Allow the soup to simmer on low for about 30-45 minutes. That's it... simple with very little hands-on time. |
Archives
October 2022
Categories
All
|


 RSS Feed

© COPYRIGHT 2015. ALL RIGHTS RESERVED.