Real Life with Heather
  • Home
  • About Me
  • Blog
  • Goal Setting
  • Financial Journey
    • Personal Finance YouTube
    • Budgeting with YNAB
  • Weight Loss & Life YT
  • Shop
  • The Pups

6/6/2016

DIY Lotion Bars

Comments

Read Now
 
Picture
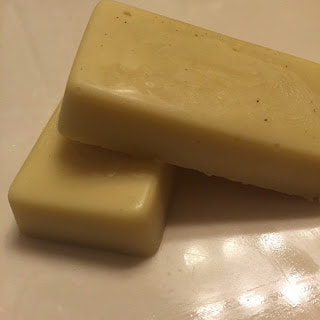
I recently discovered lotion bars and I pretty much love them. In my opinion, they aren't for everything but I love being able to use them on my hands and arms after a wash-up without the grease that typically comes with lotions. Don't get me wrong, I love (and use regularly) my body butter... just for different purposes than I use lotion bars for. A lotion bar has become the go-to for my morning routine and I don't see it going anywhere anytime soon, especially with the hot Texas summer coming up!
​

A couple reasons I have a few of these bars around the house: 
  • I prefer them at work as I type and handle paperwork for a good portion of the day now (so my hands tend to get pretty dry) and body butter and lotion can leave grease marks behind for a few minutes after application... not so awesome, but a non-issue for a lotion bar! 
  • They don't require a jar or container. A plastic bag would be a good idea if you are going to travel with them in your bag or some such but decorative jars can get costly! I have purchased dozens of sample containers,  decorative jars, and etc. for gifts and for myself in the last year and the cost really starts to add up.
  • Your body heat is enough to melt a small amount of moisturizing 'lotion' onto your body as soon as it touches your skin but the bar still retains it's shape and doesn't melt away before my eyes. I'm in Texas, it gets really hot here if you didn't know (lol), and I've had DIY lotion melt in it's container when out in the heat for long periods of time before. These last much longer due and tend to hold their shape as the beeswax content is greater. 
  • They make pretty gifts and even decor while they sit waiting to be used.

Not sure if you would like them? The good news is that these bars are quick to and super easy to make so you can try them out without much at stake. Plus, you can customize them with various molds and additives to make pretty gifts for friends and family or as a bit of decor on the bathroom counter top... but you'll like them!


First Up, Gather Your Ingredients:
  • A ratio of 1:1:1 of Coconut Oil, Moisturizing 'Butter' and Beeswax (I used a mixture of Shea and Cocoa Butter in mine).
  • Vitamin E Oil (I like to add a few capsules worth of Vitamin E to my lotions for extra moisturizing power) *optional
  • Essential Oil(s) of you choice *optional
  • Decorative (dry) items of your choice such as cocoa, dried flowers/flower petals, dried zest, etc. *optional

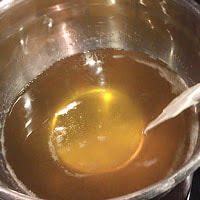
The How-To:
1. Melt all ingredients in a double boiler on low to medium heat. 
Don't have a double-boiler? No problem! Since I am living with my parents at the moment I don't actually use a double-boiler for this... just a pot of boiling water with a metal or glass bowl inside. It works great!
Picture
Picture
2. Add in any essential oils you would like in your lotion bars.

3. This is your time to customize your bars! For the bars shown below I did the following (before pouring the mixture into the molds) to showcase the scent and add a bit of a decorative touch for gifts:
    a. Chocolate: Dust a small amount of cocoa powder onto the mold.
    b. Lavender: Sprinkle a few dried lavender buds into the mold.
    c. Sweet Orange: Sprinkle a bit of dried orange peel into the mold.

​You could also do rose petals, dried lime or lemon rind, ground cinnamon or vanilla... the possibilities are endless! 

Note: Use dry ingredients so that the moisture content is correct.
Picture
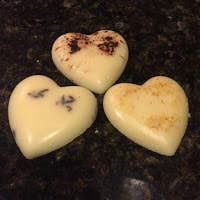
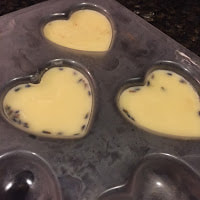
 4. Pour the mixture into soap molds (or cupcake tins, chocolate molds, etc.) and pop into the fridge until they harden. 
Picture
5. After ensuring that the bars are fully cooled and solid remove them from the mold and package as you wish.
Picture
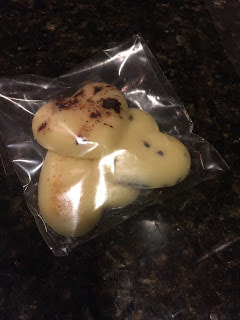
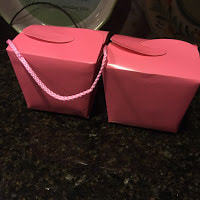
6. Give them away in gift baskets or as hostess presents... or use them yourself!
Picture
Picture
Picture
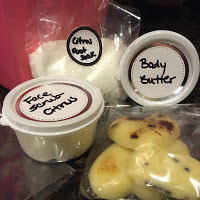
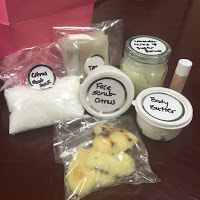
Non-perishables I used in this DIY (I used a different mold from Hobby Lobby but prefer the silicon ones over plastic so have added a few silicon ones here for you guys).

Share

Comments
Details


    Archives

    October 2022
    August 2022
    July 2022
    June 2022
    May 2022
    April 2022
    February 2022
    January 2022
    December 2021
    November 2021
    October 2021
    September 2021
    August 2021
    July 2021
    April 2021
    March 2021
    January 2021
    December 2020
    November 2020
    October 2020
    July 2020
    May 2020
    April 2020
    March 2020
    February 2020
    January 2020
    October 2019
    September 2019
    July 2019
    June 2019
    May 2019
    April 2019
    March 2019
    February 2019
    January 2019
    December 2018
    October 2018
    September 2018
    August 2018
    June 2016
    March 2016
    February 2016
    January 2016
    October 2015
    September 2015
    August 2015
    July 2015

    Categories

    All
    21 Day Sugar Detox
    App
    Budget Basics
    Budget Review
    Clean Home
    Daily Life
    Dairy Free
    Declutter
    Dessert
    DIY
    Dogs
    EFL/ESL
    English
    Experiences
    Extra Cash
    Financial Updates
    Fitness
    Gadget
    Gluten Free
    Goal Setting
    Goal Update
    Guest Post
    Health & Wellness
    Household Products
    Investing
    Journey To Health
    Keto
    KonMari
    Lists
    Managing Healthcare
    Meal Prep
    Medical
    Mental Health
    Moving
    Natural Living
    Organization
    Paleo
    Personal
    Podcasts
    Recipes
    Review
    Save Money
    Seniors
    Side Hustles
    Spoonie
    Teaching Online
    Tips & Tricks
    Travel
    Trials
    VIPKID
    Weight Loss

    RSS Feed

Picture
© COPYRIGHT 2015. ALL RIGHTS RESERVED.
  • Home
  • About Me
  • Blog
  • Goal Setting
  • Financial Journey
    • Personal Finance YouTube
    • Budgeting with YNAB
  • Weight Loss & Life YT
  • Shop
  • The Pups