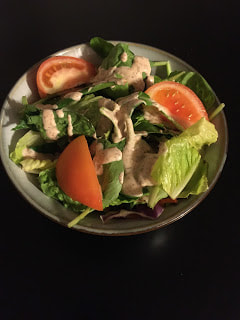
 There are some things I miss more than others with this new way of eating... one of those things is a good ranch dressing on a spinach and mixed greens salad. I tried for months to find a recipe I enjoyed but never found one that was exactly what I was looking for. Don't get me wrong, a quick google search of "Paleo Ranch dressing" will net you several good recipes for ranch but I enjoy quite a bit of dill and a nice bit of garlic in my ranch dressings and none quite hit the spot. This one started out as a combination of several of those googled recipes actually but my ex-husband really likes spicy food and I was working to not only feed myself healthy food but find things that he enjoyed eating as well... so this buffalo ranch recipe was born. It was just spicy enough that he didn't care that it was 'healthy' and made his salads a bit more palatable so we were both eating better. Now its just me around the house so I don't make it as often as I used to but I have taken this dressing to pot lucks where no one but myself was eating Paleo and everyone had rave reviews. INGREDIENTS:
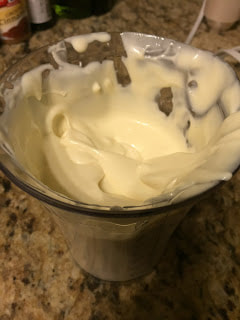
PROCEDURE: 1. Arrange your ingredients and tools. I was cooking several things the day I made this recipe and apparently I decided that I should put extra spices in the picture... sorry about that! 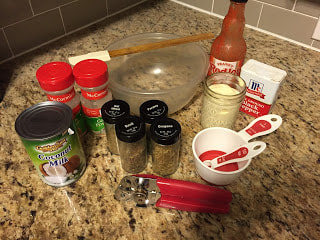 2. Mix the mayo and coconut milk together in a bowl. 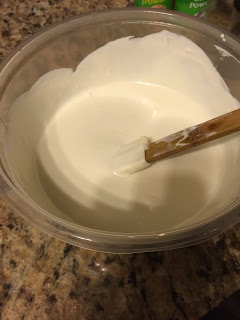 3. Add the spices and mix well. 4. Slowly add in the Buffalo Sauce. I put this in last so that I can add more to taste as sometimes I am really craving something spicy. In that case I want more buffalo sauce so I taste as I go to make sure to get the perfect blend of what my taste buds are craving. NOTE: If you use canned coconut milk the dressing will turn out slightly sweet compared to the refrigerated kind. For this reason I typically use the refrigerated, unsweetened unflavored coconut milk. Today I was out so I turned to my pantry as I always have a jar or two in my pantry staples. 5. Pour the dressing into jars with airtight seals and refrigerate. 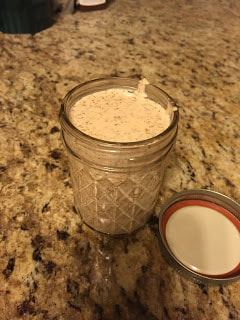 If you lacto-ferment it then it will last about 2 weeks in the fridge. If you do not then it tends to last about a week. It is also really easy to scale up or down this recipe depending on how much you wish to make.
What is your favorite Paleo-friendly dressing?
Mayo is a pretty simple and quick condiment to make with the right tools. I have heard of people doing this by hand (ow...) as well as in food processors and with mixers. It seems the best way to make mayo is with an immersion blender and the second best way is with a food processor from what I have heard from others who have attempted this, and similar, recipes. Using an immersion, or stick, blender I have yet to have a batch fail to come out properly but the key is in the super slow drizzle of the oil.
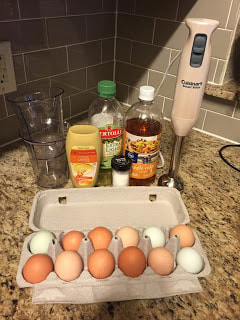
Let's start with the basics of mayo making... you need eggs, an acid, an oil, a bit of salt, mustard, and possibly spices. Some people use egg whites with lemon juice and olive oil while others use apple cider vinegar with whole eggs and avocado oil... it all depends on what flavor you want to come out with in the end. If I want an aioli for instance I am going to use the lemon juice option and toss in some garlic at the end. On the other hand, if I want a good herb mayo spread I'm going to go with the apple cider vinegar and stick with a less flavorful mustard so that the flavors of the herbs I add really stand out. Not only are there many different combinations to make mayo but it is a pretty useful thing to have. It can be used as a spread, in casseroles, in tuna (or egg) salad, in dips and other appetizers, in sauces, as the base of creamy salad dressings... you'll be surprised how many uses for mayo there are when you start looking! My basic mayo recipe is as follows: INGREDIENTS: 1 C Extra Light Tasting Olive Oil (not EVOO) 1 Large Egg Yolk 1 Tbsp Apple Cider Vinegar 1 Tbsp Dijon Mustard (I prefer Dusseldorf mustard but they didn't have any at the market... sad day...) Salt to taste PROCEDURE: 1. Mix everything except the oil together in a bowl. *It is best to use eggs that are at room temperature as they tend to emulsify better I have found.
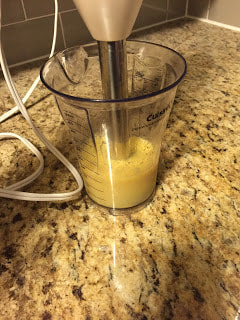
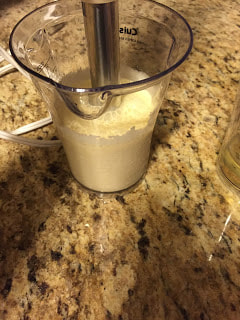
2. Use the immersion/stick blender to whip up the mixture as you SLOWLY drizzle in the olive oil. The key here is slow and steady.
3. Put the mayo into an airtight container and refrigerate.
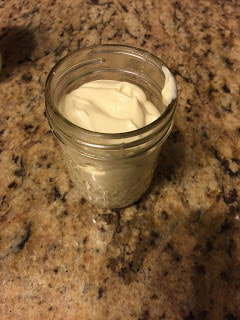
If you lacto-ferment it then it will last about 2 weeks in the fridge. If you do not then it tends to last about a week. It is also really easy to scale up or down this recipe depending on how much you wish to make. If you don't know how to lacto-ferment your condiments it is a really simple process that I will cover in a few days... so come back and check it out!
What do you use mayo in? What additional spices do you add to it to give it that extra kick of awesome (I've heard of a spicy mayo that sound pretty amazing)? The blender I have is the first one below and I love it but the price has gone up a bit so I also added one that is a little more cost effective.
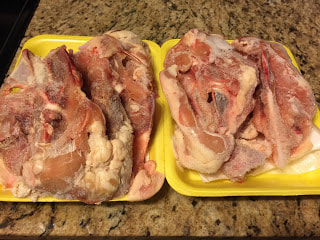
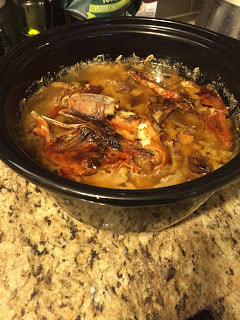
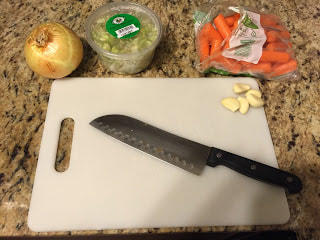
Bone broth is one of the easiest, most versatile and healthy recipes in the Paleo arsenal. It has a plethora of minerals and proteins that your body needs to run optimally and it tastes great too! As I have joint issues it is very important for me to get a lot of gelatin (and other joint supporting nutrition) into my diet so I LOVE using bone broth in my dishes. Personally, I use it as the base of many of my soups but it can also be used to de-glaze pans when making sauces, roast or saute vegetables, add flavor to a variety of main and side dishes or even drink it alone if you are so inclined. My recipes for bone broth is both super simple and works in the crock pot... which means that I do next to no work to get this fabulous broth! I don't often go through enough meat in any one month to have enough bones using only my leftover ones unfortunately but lucky for me there is an Asian market about 10 minutes away that stocks bones by the pound so I can make bone broth whenever I run out.
A tip for freezing: freeze it in ice trays or other shallow dishes for easy thawing later. I have found that ice trays are perfect as they are pre-measured and small enough to thaw single serving portions fast but I can always grab my bag of broth cubes and make stew quickly as well. Here's the recipe: INGREDIENTS:
PROCEDURE:
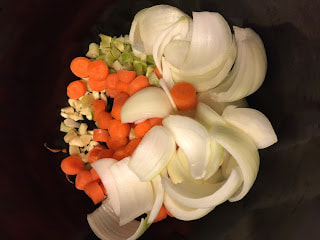
2. Add the chicken bones to the crock pot.
3. Fill the crock pot the rest of the way with water.
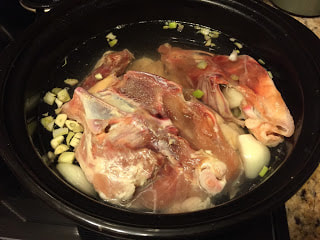
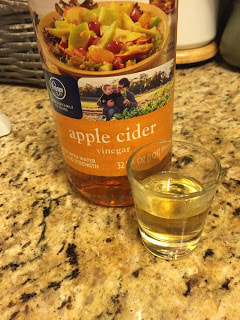
4. Add vinegar
5. Place top on crock and turn the crock pot on low temperature

6. Walk away for 24-36 hours
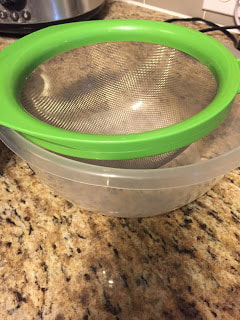
7. Strain the broth through a fine mesh to remove veg and bones
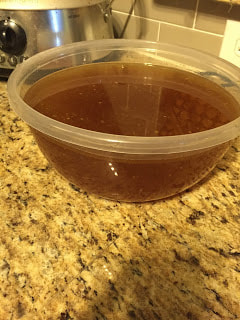
8. Cool the broth
9. Remove layer of fat that solidifies on top of the, now gelled, broth if using non-grass fed/pastured animal bones
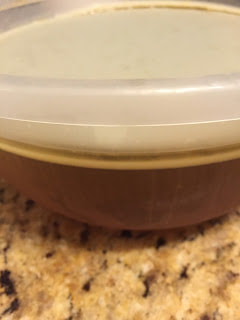
10. Measure out the broth as desired. You can typically keep it in the fridge for about 5 days or freeze part of it if you won't be using it all right away
*I have an adverse reaction when I chop celery (instant migraine) so I purchase my celery pre-chopped but this isn't necessary nor necessarily optimal.
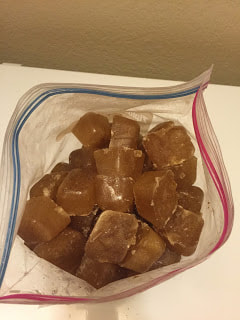
Your broth may vary in color from batch to batch depending on the bones you are using, the amount of remaining flesh, whether you roast your bones before using them for broth (good for beef bones especially), and the additional ingredients you add such as veg and herbs. Beef broth, pictured in cubes above, tends to be darker than chicken or fish for instance. Curious where I get my ingredients? I get my ingredients all over the metroplex, on Amazon and through Young Living as a distributor. Don't want to search out stores to pick them up? I'll make it easy! You can place an order through me for any oils you may need and here are some quick links for the non-perishable ingredients and tools on Amazon should you wish to order online:
|
Archives
October 2022
Categories
All
|
 RSS Feed

© COPYRIGHT 2015. ALL RIGHTS RESERVED.